Nyerguds
-
Posts
6190 -
Joined
-
Last visited
Everything posted by Nyerguds
-
Technically, CnCNet 4 is ALSO outdated, White
-
I was hoping our hackers would finally kick that out of RAED. I mean, how hard can it be to make it read the header directly instead of always attempting to decrypt it? The Encrypted status is a field in the header, after all...
-
Additional note: the best way to start a project is normally the "Create project from .mrf" option in the File menu. It'll allow you to select the .mrf to recreate in the project, and will automatically make all the filters, create the index table if it has one, and automate a bunch of the colour-excluding and subpalette-detection for you (if you select the options to do that).
-
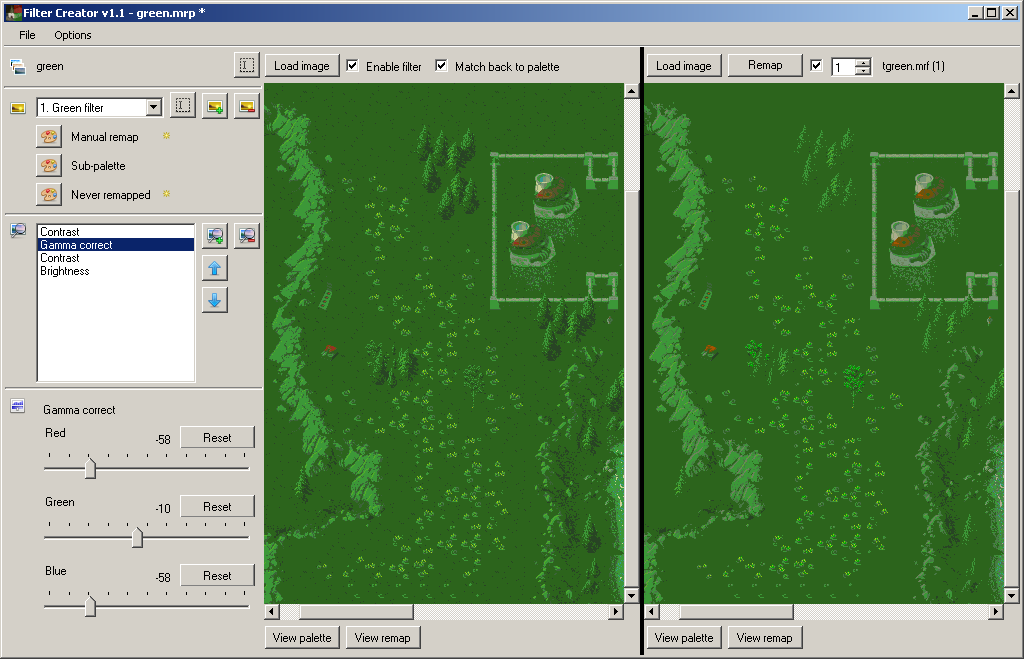
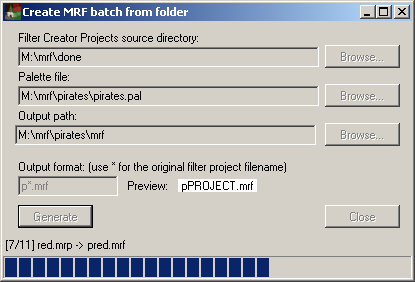
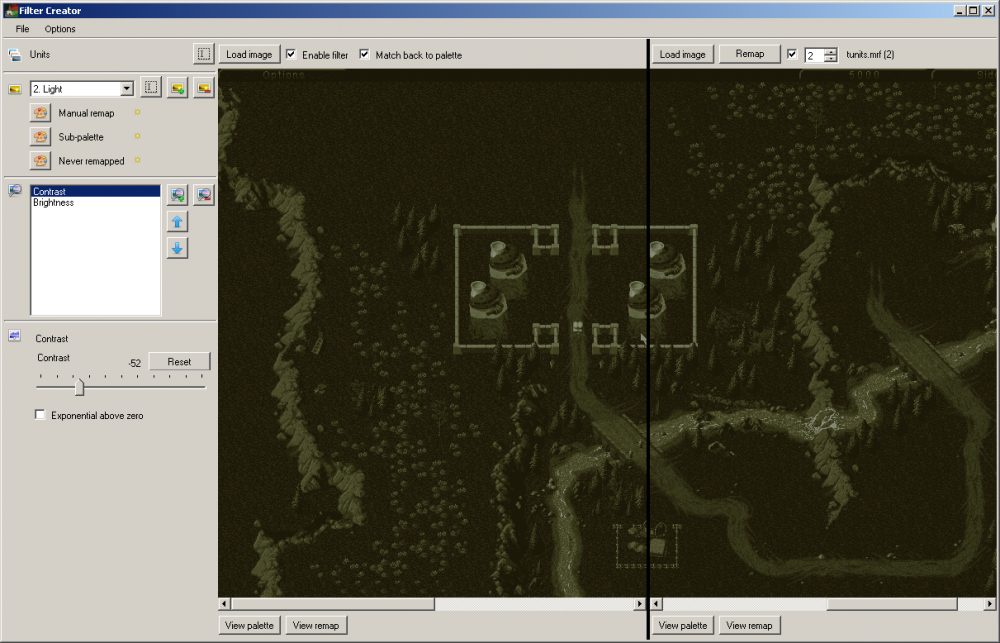
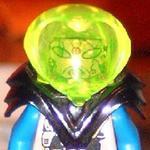
I'll just repost this here, since PPMsite is a mess these days. I have been making a tool to create .mrf files for C&C1 (RA seems to generate these tables in memory rather than keeping them as files). These files are basically palette remapping tables, used in the game to make colour effects like shadow, map shroud edges, stealth darkening (though not the actual effect), the targeting flash when giving attack / repair / dock commands, and a bunch more. Since they are relative to the theater's palette, they are a vital step to fully customizing terrain. Download: FilterCreator_v1.11.rar - The tool, plus all of the mrf creation projects. (requires .NET framework 3.5) All icons used in the program (except the actual program icon) are based on the Fugue Icons 16x16 pack by Yusuke Kamiyamane (Copyright © 2010) Test data: FilterCreator_testdata.rar - All .mrf files in C&C, plus example screenshots to test on. Source code: FilterCreator_src_v1.11.rar (Visual Studio 2010 project) Now, on to the tool itself: The actual main tool's purpose is to recreate the existing filters in the game using brightness / contrast / colour balance / etc filters. However, since I already reconstructed all filters in the 11 .mrf files C&C1 needs for a theater, you can just go to [File] -> [Write multiple .MRF files...] and simply generate all the tables you need for a new theater. All you need to do for that is selecting the folder with finished projects that comes with the tool, the palette of your new theater, and an output folder: This sub-tool can also be started directly by starting FilterCreator from a shortcut with the command line parameter "-mrfui" --- The current included projects are obviously just my own reconstructions. They were created to quickly allow people to make new theaters, but they're probably far from perfect. So, if you want to try your hand at it, or if you simply want to view existing .mrf files, here's the overview of the UI functions of the main tool: Right pane: the preview of the original .mrf file. It shows the filename of the loaded mrf file, and the amount of filters inside the file. Left pane: the project. The filename of the loaded project is shown in the title bar of the program. The controls get more specific as you go down on the left pane. Top is the project description... a completely optional field, really. Below that is the filters dropdown. Each filter is a "sub-project". The three palette buttons allow you to manipulate the final palette in three ways. In all three cases, a yellow asterisk will indicate if anything is customized in the three options. The first one, "Manual Remap", allows you to force certain colours to certain other colours before applying the filters. This can be used to make index tables as some mrf files have, or just to change certain colours before adding filters to them. Practically all existing filters seemed to have changed the animated water colours to white before applying their effect, so you probably need to use it for the same thing. Notes: The specific indices set in this way are only preserved as that specific index if no effects are applied to it later. To set colours here that are not affected by the effects on the filter, you need to also set them in the third function, "Never remapped". The second, "sub-palette", allows you to exclude colours from the used palette. This is usually used to exclude index #0 black from the used colours. Note that this can also be used in reverse, to select specifically the only colours to use for generating the palette. This is used for the unit shadow and some other filters like it, which use specific colours on the palette. The third palette option is the "never remapped" list. This will allow you to select colours on the palette that will always remap to their own index (unless set to another index by option #1). These indices cannot be affected by the effects in the filter. And, the last palette option, located at the top, next to the "enable filter" one, is the "Match back to palette" checkbox. If this is not enabled, you will see the filters as applied to the image, without taking into account the palette to remap back to. This also means it ignores the selected sub-palette, though force-remap and never-remapped entries are taken into account. Under "Options", you can find an option to synchronize the filter between the left and right pane if possible, so that when you load the .mrf that corresponds to the project, it'll always show you the right filter from the file. Then we have the effects. Available effects are Brightness, Contrast, Gamma correct, Colorize, Saturation change, Luminance change, and a combined Hue/Sat/Lum adjustment control. All effects you add to the list stack up to create the final filter. Since their order often makes a lot of difference, you can move effects up and down in the list. Below the effects you see the actual effect sliders. The preview on the image is instant, though it might lag a little if you drag it around while "match back to palette" is enabled, because every small change will need to recalculate the remap table and apply it to the image. That's it, I guess. The options in the menus should be pretty straightforward.

-
I just wish I'd get my hands on the values (and the exact colour manipulation methods) RA1 uses to generate its internal tables. It would make it peanuts to make all the other projects for this tool -_- [edit] The downloads in here are outdated; get the latest version here.
-
The tool is finished. The final version supports command line opening of projects, meaning, if you put the tool on a fixed place, you can assiociate the .mrp extension with it. It also supports drag & drop, of both .mrp and .mrf files. If you open an .mrf file in the tool that way it will not be used as filter for the viewer, though; it will be opened to generate a project file, with the right set of filters, and some smart scanning options are available to automate detection of stuff like index tables and unchanged colours on the remap tables. You can find the download here: FilterCreator_v1.00.rar This includes two fully finished example projects; the targeting flash when giving an attack / repair / enter command, and the unit shadow. Final goal is, of course, to have all of the .mrf files reproduced that way. Source code pack Test data pack (note that there's no explicit support for the XXXX_VTX.PAL files - you'll have to change the file type to "All Files" to open them.)
-
Well. That was easier than expected. Seems my "hue" control wasn't even necessary for this; just specifying the palette's shadow colours as only colours to use effectively matched it to that colour. This filter gives exactly the same correct effect in both Desert and Temperate (I'll give a download later, but for now I've done half of this stuff manually in the project ini file rather than making the palette selection dialogs for these palette buttons XD) One minor annoyance, though: screenshots taken with cnc-ddraw actually capture the palette at that moment, meaning the fading white on the last palette colour is not the correct 252,252,252 value it should be, but some random shade of grey. Though this can be remedied by force-remapping index 255 to colour 15, the pure white Nevermind, force-remapping has no influence on colours set to never be remapped -_-
-
 Because it's goddamn hard, lol. You can't even get into your heli without first destroying all SAM sites in a wide area around it, most of them close to defences you normally evade in the mission. Then again, I don't think bombed buildings spawn infantry in TS... which might make the whole mission tons easier. So maybe that could be considered. Looking at the mission layout, an APC put somewhere around waypoint 11 should be possible to get to, without bomb survivor damage Then once loaded, the APC can just drive off the map to the east, with the commando. (do note waypoint 11 is a tank patrol point. Might be best to make the tanks ignore the APC by making it neutral somehow)
 -
First beta version. I've decided to use yellow asterisk icons to indicate that the palette stuff has been modified. Note that the palette buttons don't work yet, but you can fill in most of their contents automatically by using the "Create project from .mrf" function.
-
Yeah, but as I said, him suddenly spontaneously disappearing will look pretty dumb.
-
Eh? No, I mean if you expand the terrain to go from mission 6 to mission 7 if you bombed the wrong building, the commando there still has to get out of there, somehow. Or be removed, or whatever. So that once you recommence the thing but with a base, you don't still have a commando in the enemy base I mean, it's not supposed to be a suicide mission. You can't just let the guy die. The point is the Commando went in, bombed something and got out, but maybe targeted the wrong building. If it goes right on to Carter telling you you bombed the wrong thing, while the commando's still right there, there's technically nothing to stop you from ordering the guy to just bomb something else too. So to fully emulate that in one mission, this should happen after any building is bombed: -Battle control is disabled, and the "if the commando dies, lose" trigger is disabled too. -The commando is shown running off the map, maybe killing more soldiers on the way. Depending on which building he bombed, you can do that either by moving him off to the right side, or maybe if it's one of the buildings in the north row, you could put barrels next to the wall there, make him blow that up and walk off to the north. It's possible the commando doesn't survive this last trip, but that's not really important -Then, if the correct building was blown up, the mission simply succeeds. If not, you get the next mission's briefing video as radar video, the map expands, and you scroll to the location where your new stuff will be dropped off. -Battle control is resumed. Also, to emulate it better, the shroud should really be reset. Not sure if there are triggers that can do that.
-
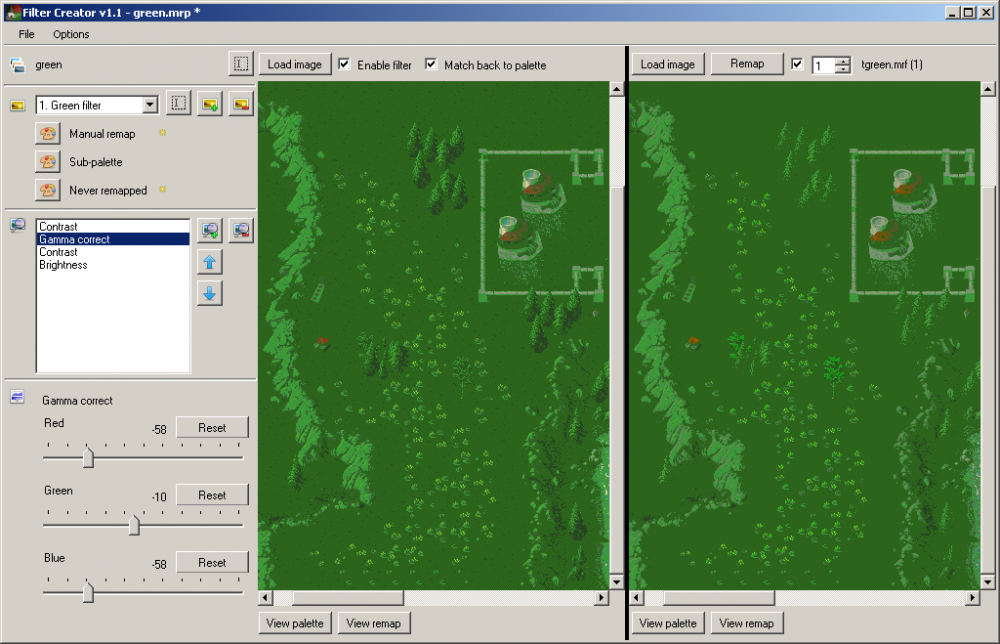
I just finished the UI for the final tool. I need some suggestions on this... Overview: (left part only; right part is just the viewer) The top part, with the icon with the 3 coloured images, shows the name of the project. I might just move this to the title bar, not sure. Anyway, I will probably still need new/open/close/rename buttons for that somewhere. I might add a menu bar for that at the top. The dropdown under it, with the icon with the yellow image, will contain the Filters. Each filter represents one remap table. The white box under that, with the icon of the image with the coloured magnifying glass, are the different effects (hue/sat/lum/contrast/etc modifiers). Clicking on one of these will immediately show their adjustment bars and options below that, in the empty part with the adjustment slider icon. Now, all this is pretty much final. The thing that kind of bothers me are these 3 colour palette icons: "Manual remap" allows changing colours manually before the filters are applied. Many mrf filters set all water colours to white, so that needs to be reproducible. "Sub-palette" allows setting a range of colours to use for the remapping. If used, only these colours will be used for the final filter (or, if the "Exclude" checkbox is enabled, al colours except the selected ones are used) This is needed for the shadow filters (see screenshots above) which only use the last 16 colours on the palette. "Never remapped": Quite straightforward. These indices are never touched by the remapping project. They will always map back to their original index. The background black at index 0 is usually excluded that way. But, yeah... the way these 3 buttons are there kind of bothers me. I'm just not sure if I'd need any kind of indicator to show which stuff is modified by them, or something. Any suggestions are welcome.
-
If you change the boundaries, you do have to somehow make sure the commando is removed...
-
Destroy soviet convoy trucks - soviet 10a reloaded
Nyerguds replied to Messiah's topic in RA Singleplayer Maps
We prefer to stay neutral on such things... there are a couple of Russians who occasionally visit this place, and they might not appreciate it. -
Yeah, C&C has no missions that affect the next one, except, as Jacko said, for mission 6, where blowing up the correct building (the airstrip) skips mission 7 completely, and if you don't get the correct building, then that building is missing from the base at the start of mission 7. So maybe the pre-mission system could be used for that. (Destroying either the construction yard or refinery still totally cripples the base in mission 7 )
-
Ahh. That'd fix it, yea. One issue though... snow, on a moving conveyor belt? Wouldn't stay on there long I'd imagine
-
Small update to the viewer: added an option on the remapped palette viewer to filter out only the indices that are untouched by the remap (meaning, where the value on a certain index equals the index itself). This'll come in handy when recreating filters on the final mrf generator tool
-
Right. Seems obvious... the filter for the movement flash is a brightening effect, and since the snow is already so bright, it doesn't give enough contrast. In C&C, where every theater has separate filters, they could simply have made a darkening filter for the movement flash instead (something worth looking into for the C&C95 Snow theater, in fact), but they chose to instead make the filter global and the SHPs theater-dependent. This looks more and more like these filters are internal, one way or another, though The only possible candidates for the filters, a bunch of completely unidentified files in local.mix, were tested out, and thought their file sizes are multiples of 256, they're definitely not mrf filters.
-
So... the Snow one doesn't have "a filter set on a different colour index"... it simply doesn't use the filter? Huh.
-
I have full-size screenshots of all TD missions, and a guide to understanding TD mission scripting. Map pics: http://nyerguds.arsaneus-design.com/cncstuff/mappics/ (All C&C1 missions. Though I suspect you'll stick to "campaign-gdi" and "campaign-nod" for now ) Mission making manual: http://nyerguds.arsaneus-design.com/cncstuff/cctxt/ccmanual.txt Question, though... what are you going to do with the alternates? C&C has 2-3 alternate choices for practically every mission. TS has no system to support such alternates at all. Heck, the GDI campaign actually splits up into east and west side of the map on missions 4 and 5.
-
Wow. Weird. Different per theater... then there must be tables for that SOMEWHERE :-\
-
It might be in the mouse cursor SHP... which is Dune II SHP format, just to be annoying, and needs the Red Horizon toolset to be converted Anyway, the issue is the lack of .mrf files to change on RA1 [edit] Huh, indeed, odd. No moveflsh.shp in RA1. Though there is a shadow.shp for the shroud edges, at least [edit again] Found a converted RA mouse cursor png on my disk... it has no movement flashes in it either.
-
Would give trouble ingame though... don't think there are any civilian buildings it could replace without getting out of its original bounds.
-
Well, this is odd, and annoying... it seems RA1 has no .mrf files, or anything comparable, except for the vortex fade. This could mean two things... either they are all hardcoded in the exe... which would seem completely bizarre, since the palette and even remap definitions are external files... or, it generates them on the spot in memory, like those ????_VTX.PAL files for the chrono vortex, but without saving them to disk. However, that would mean it should never have any errors, so it's not true either... The only other thing I could think of is that maybe it generates these effects on a master palette (in which case I'd assume, the palette of palette.cps, which has the remap definitions), and doesn't do it per-theater. Maybe one of the RA1 hackers can shed some light on this, because I'm stumped.
-
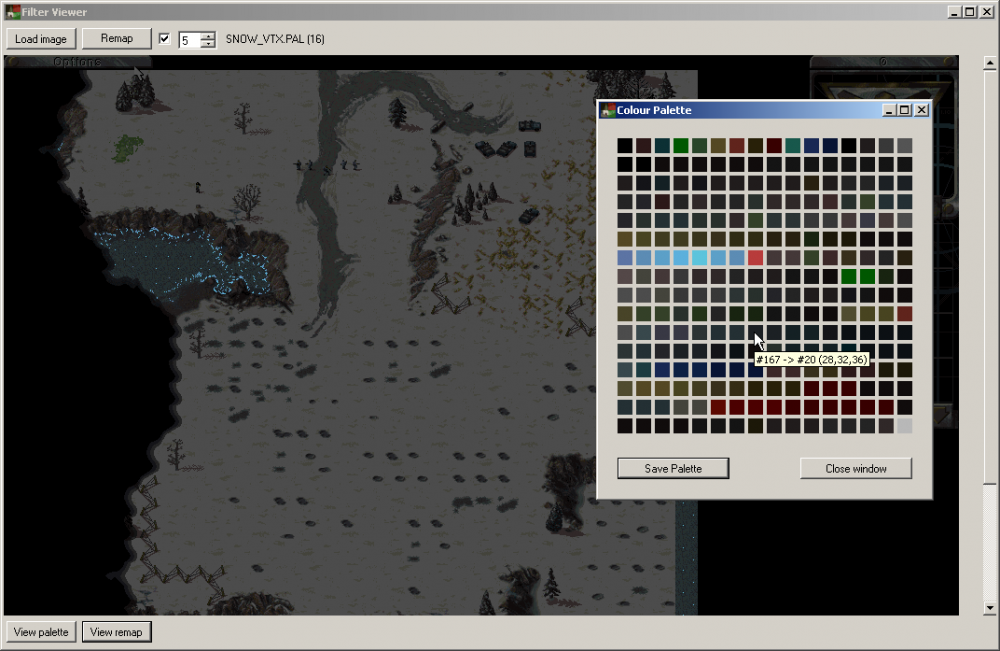
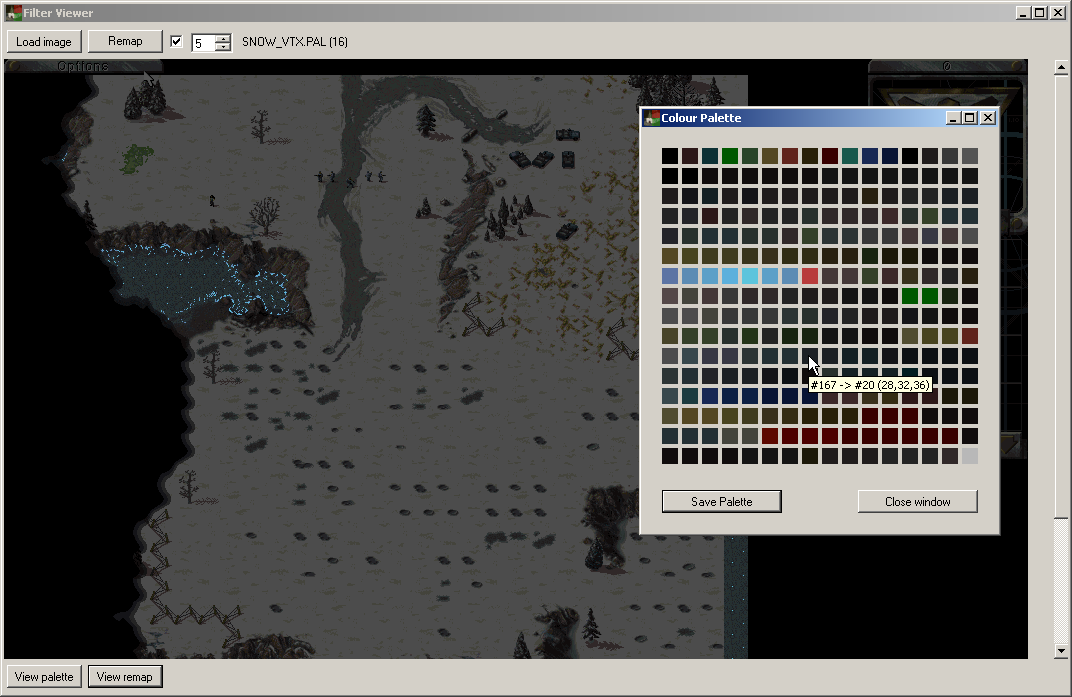
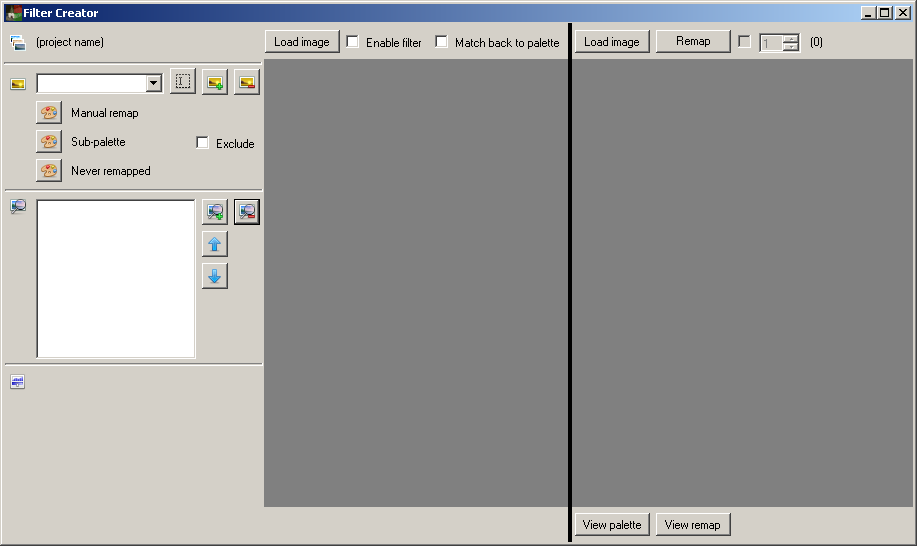
The RA chrono vortex files revealed: SNOW_VTX.PAL opened in my tool As I had predicted from the start, it's simply a 16-step fade to black. Nothing to do with the actual distortion animation. This image shows the "view remap" function, btw, showing the actual effect on the palette. The previous pic showed the "View palette" function, with the checkbox to only show the actual colours used in the remap. (I didn't put the .pal extension in the tool, though... hadn't tried anything from RA1 so far)