-
Posts
1467 -
Joined
-
Last visited
Everything posted by [CC] RaVaGe
-
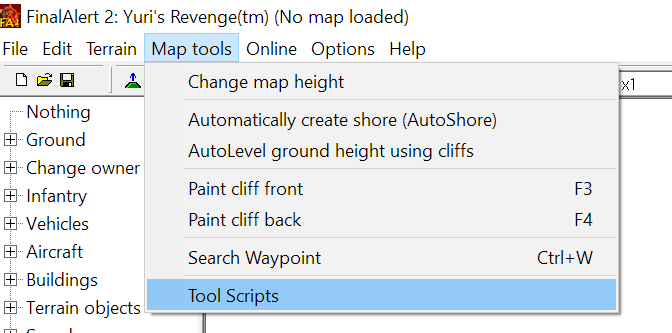
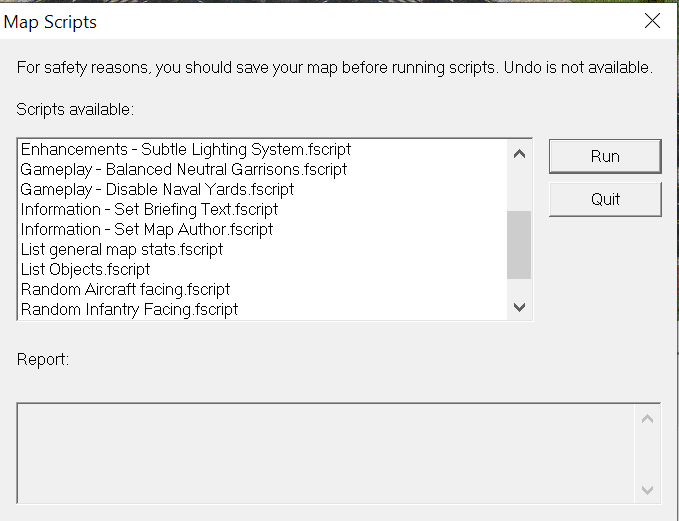
How to make Command & Conquer Red Alert 2 and Yuri's Revenge Maps This guide will help you set up Final Alert 2 and give you the basic assistance to start creating your own C&C Red Alert 2 & Yuri's Revenge maps. At later stages of this tutorial you will also learn to create full-sized map previews and also with some links to help you add modified units to your maps. Content Setting up Final Alert 2 (this post) Enhancing Performance (this post) Useful Add-ons (this post) Configuring Final Alert 2 (this post) Creating a New Map How to add water to the map How to add cliffs and mountains to the map Add stacked cliff and mountains Manipulating terrain height Adding Resources Regenerating resources Adding tech buildings Adding Garrisons Terrain Detailing with Trees Terrain Detailing with Tiles Saving your map Rendering map previews Miscellaneous video tutorials & additional information Setting up Final Alert 2 If you already haven't already you can download Final Alert 2, the map editor for Red Alert 2 & Yuri's Revenge from the link below. New version 2.02b For modern systems with faster performance. FinalAlert2YR_v2.02b.7z Old editor version 1.04 It comes with FA2SP.dll, which is included for more editor features. Final Alert 2 YR v1.04.7z After you've downloaded it, extract the map editor to the directory of your choice. At first run, FA2 will ask you to select your game directory for Ra2.exe to load the terrain data from the game files. Once done, follow this tutorial to set it up for smooth editing & map creation. Note: that this version of Final Alert 2 doesn't come with an installer and is compatible with modern operating systems. Features This version of FA2 is based on FA2 SP by Secsome and E1 Elite : https://ppmforums.com/topic-47342/final-alert-2-yr-v102-patches Release notes and details of applied patches are included in the README folder. Saves properly in all formats, including .map. Properly configured DDraw Wrapper for modern systems. An additional ddraw.dll for systems that encounter difficulties with the default. Re-designed UI layouts and menus for a better user experience. Bug fixes. New Tool Scripts. Includes the following Tool Scripts: Enhanced Lighting System (enhances invisible light posts and tech structures). Lightning and Thunder (made in collaboration with MirageTD/ChronoVortex). Harmless Wildlife (Removes weapons from wild animals and reduces their health). Balanced Garrisons (reduced infantry slots in neutral bunkers and some other structures). Disable Naval Yards Set Map Author Set Map Briefing (Delete your old Scripts before copying to take advantage of the new ordering for scripts). Download Scripts separately: Final_Alert_2_Scripts_v1.4.7z You can find the new scripts after installation under the "Map Tools" > "Tool Scripts" menu options. Setting up Final Alert 2 Note: that Final Alert 2 Unofficial Version 1.04 comes pre-configured so you can skip this step. Now that the map editor is installed and optimized, let's configure the settings for the best experience possible. Most of these settings I've learned to use over the years, mainly due to finding out that they can prevent accidental bugs in the maps and remove minor annoyances. I have set up Final Alert 2 "options" as follows. Disabled Sounds (really annoying) Set it to Show Building Outline, helps to avoid placing buildings ontop of other terrain objects such as trees. Disable AutoShore (this is to avoid a bug where the map editor places random shore tiles in random areas of the map when working with water tiles) Disable AutoLat (same reason as above, turn this off when detailing your map) Disable Slope Correction (this is to avoid a bug where the map editor throws random slopes over the map when levelling terrain) The Heighten, Lower & Flatten ground tools still work as intended when this is disabled so it's best to disable and forget. For Final Alert 2 to work perfectly with the original game, configure the "Settings" as follows. Browse for your game installation directory in the first field, if it's not set up automatically. Make sure that the "Support settings" are set to "Support mission disks and mods" as you won't be able to make or edit maps for YR if this is not enabled. Congratulations, you have just set-up Final Alert 2 to create epic maps!
-
Are you sure the folder contains Ra2md.mix?
-
@ChallengerX_Pro I just checked your map in Final Alert's Framework Mode and I can see your cliffs are full of bugs... The pink line needs to connect at cliff level and tiles shouldn't overlap, as you can see top left the 2 cell cliff tile (3) is not connecting to tile 4 under neath it. Also middle right, your cliff corner is overlapping with the tile behind it so the top level cliff is not set up properly at all. These bugs will cause movement/pathfinding issues in game when a player wants to send units around that cliff. You should avoid the following spots issues... The spot between 5/4 top level is a slope tile, if you open the cliff tile set there's a special tile that fits in there. You've erased the top level line on tile 4 and have slope tile between 2/4. Cliff has no back tile at bottom right corner, (4) it should use a corner cliff tile. Connecting inner corner tile is missing, you can find it in the cliff tile set. Inner corner tiles missing, slope is not connected to the cliffs on the right. ALWAYS use framework mode when making cliffs. Build cliffs with the cliff tileset!
-
Browser for game directory where you have ra2.mix & ra2md.mix.
-
Download C&C Maps renderer GUI version 2.3.0
-
Map renderer...
-
![[CC] RaVaGe](https://forums.cncnet.org/uploads/monthly_2021_05/Kirov_Airship_Avatar.thumb.png.30c4720310984cd40c5b14aef863ee1e.png)
What things make the ladder/ranked unappealing?
[CC] RaVaGe replied to FlyingMustache's topic in Red Alert 2
https://staging.cnc-comm.com/ladder/3-2018/yr/player/SUOMI Seems like he took the challenge. -
What things make the ladder/ranked unappealing?
[CC] RaVaGe replied to FlyingMustache's topic in Red Alert 2
He means using fog of war instead of shroud like modern RTS games, eg: starcraft, warcraft 3... etc So that players can see the terrain and tech buildings, but not the opponent, this would do wonders in helping players learn maps. -
For me I had that on XWIS except we had a few guys we'd always ffg with, so onetime we did around 18-20h straight 2v2 ffgs, some guys played for 1-2h and left and another came back, the next morning a few of us had gone to do something for some hours and came back. Probably the best set of 2v2s I've ever had, game quality was real consistent too. Miss that shit. KoreaMigX, idk what his nick is now (keep forgetting) he knows what I'm talking about, he was one of the 4.
-
Ask for a pro to help you, I'm usually on. PM me if you want a lesson on the basics, you can learn from there yourself. Takes some people a few months to be able to beat a pro at their level.
-
@dkeeton Did your RA2 mode fixes break this functionality?
-
@Grant @dkeeton Engineers need to be set as starting units and refinery should not be buildable. No other units should spawn with the MCV on game start in megawealth.
-
@Grant Update client download link to latest release version. <3
-
Go to the main page and get it yourself, would have taken about the same amount of time as typing that pointless post...
-
There's a firewall on your router too did you disable it? jk don't do it... Open command prompt AS ADMIN and type... sfc /scannow OR DISM /Online /Cleanup-Image /RestoreHealth
-
What things make the ladder/ranked unappealing?
[CC] RaVaGe replied to FlyingMustache's topic in Red Alert 2
@Omituinen Rank 1 as Allied is it possible? Perkele! -
That takes staff time, if you want RA2 on cncnet then, seeing as you're aware of the threads, how about you check em?
-
What things make the ladder/ranked unappealing?
[CC] RaVaGe replied to FlyingMustache's topic in Red Alert 2
You need to force the Sov players to use the IC defensively rather than offensively. This is what happens when two Sov players build their IC at the same time, one will try to force the other to use it defensively. -
I never knew you posted in XWIS too... O.o
-
What things make the ladder/ranked unappealing?
[CC] RaVaGe replied to FlyingMustache's topic in Red Alert 2
That's the way it's played, if you'd ever seen some top Allied players on RA2, like Adam with his Korea and Alex? (W0nn4play) with us America. They reached the top and usually kept the Sov too busy with their eco to allow IC. You should try more active playstyles, harass more and force the sov to protect miners and make em spend more money on AA. I agree with this, a competitive scene needs strict rules and consistent settings. I also play both Sov & Allied on a fairly equal level, so I understand that if a Sov is able to just go fast IC and chill while it charges then I'm clearly doing something wrong. -
I'll be what ever you want me to be, JSDeeCakes.
-
Why so salty? No. I <3 u bby! Xoxox
-
Good question.
-
You can upvote my post with the heart icon at bottom right <3.
-
Browse to your RA2/YR folder and open the configuration file called "RA2MD.ini" with notepad/text editor and add the option "SkipScoreScreen=Yes" under the "[options]" section.