Nyerguds
-
Posts
6190 -
Joined
-
Last visited
Everything posted by Nyerguds
-
Community Translation - Ukrainian Language Add-On
Nyerguds replied to Lilly Blanche's topic in C&C 1
Ah, one VERY important detail: when you open XCC Mix Editor (make sure you have the right tool; they all have similar names), the first thing you should do after making a .mix file is setting it to the "Tiberian Dawn" type (there's an "options" button). Otherwise the game hangs because the .mix format isn't what it expects. It is also very important to do this before putting any files in it, since filenames are converted to a 4-byte hash value in mix files, and XCC Editor doesn't do this when saving but when you drop the files in there, and the different game types use different calculation methods to make these hash values. I don't have much time right now, so I can't check the files, but I'll take a look at them in the evening. -
Westwood Font Editor [Development thread]
Nyerguds replied to Nyerguds's topic in Modding Discussion
A couple more micro-releases later, I'm at 1.5.9, lol. Actually using this on a project sure brings a lot of bugs, missing features and little usability nuisances to light. Fixed a crash in the previewer when one of the previewed characters is the last character in the font. Fixed a bug in the font size changing that made it change the wrong dimension (which in turn led to crashes as the symbol size dimensions on the UI tried to adapt the wrong way). Fixed the internal assembly name; it was still "CnCFontEditor". Added shortcuts for "safe" image shifting, expanding the image to the shifted direction (with support for bulk changes) Added shortcuts for changing the Y-offset (with support for bulk changes) Holding down Ctrl now enables colour picker mode, for fast color picking. Optimized refreshing of paint mode and color pick mode. Colour picker now shows a hand cursor. -
Community Translation - Ukrainian Language Add-On
Nyerguds replied to Lilly Blanche's topic in C&C 1
Well... as I said, my guide was kind of ahead of things with the ini format, though that isn't too much of a problem. The main issue that currently exists with using an ini for the text_xxx stuff is that the entries read from ini can't start with spaces; the game's ini read system trims those off automatically. For some things, like the "select transmission" (new game) screen, it might be necessary to use spaces to align the text correctly, and, well, that doesn't work. No, wait... actually, if you need to do that, there might be a sneaky way around it, but you'll need to update the fonts for it. If you want to start an entry in the text_XXX with spaces... start it with one of the characters from the KOI8-U encoding that is empty in the font (it's easy to find in the font editor, and you can just copy the character from there with ctrl+c and paste it in Editpad Pro, as long as both are set to KOI8-U). The game's read method won't trim beyond that character, and it'll show up as 0x0 pixels ingame, so that could work (I added filler characters in the fonts I gave you before, so it'll give some pixel mess with those. But it'll work with the ones I attached now.) For the rest... the guide details how to make your lang_XXX.ini. All of that stuff should work as described. Do you know how to handle the game's .mix files? You'll need to use "XCC Mix Editor" from the XCC Utilities to put everything in a .mix file. There's one thing that seems to be missing from that guide (I really need to update it to include more detailed font support), and that's the uppercase rules for special characters. This is basically just all the characters of the 128-255 character range of that text encoding, but converted to upper case, so the game's function that converts text to uppercase works on the special characters. I'll spare you the process for generating this. Just open your lang_ukr.ini in Editpad Pro, set the text encoding to KOI8-U, and then paste these lines at the end of it: ; Upper case table for char set KOI8-U (Ukranian) CapsSpecialChars=─│┌┐└┘├┤┬┴┼▀▄█▌▐░▒▓⌠■•√≈≤≥ ⌡°²·÷═║╒ЁЄ╔ІЇ╗╘╙╚╛Ґ╝╞╟╠╡ЁЄ╣ІЇ╦╧╨╩╪Ґ╬©ЮАБЦДЕФГХИЙКЛМНОПЯРСТУЖВЬЫЗШЭЩЧЪЮАБЦДЕФГХИЙКЛМНОПЯРСТУЖВЬЫЗШЭЩЧЪ Make sure to always leave an empty line at the end of every ini file you make / edit, otherwise the game's ini read system can't read the last line. As for the buttons and icons, I just converted the icons font image to an actual .fnt file. It is meant to be viewed in the font editor with the included palette "TD VCR" (palette can be changed in the dropdown at the right side). When the font is loaded, you can type the text you need into the text box at the bottom, and the preview pane next to it will show the image to paste on the icon. You can right-click the preview image and select "Copy" to get the image on the clipboard. Sadly, the Windows clipboard can't handle transparent images, so you'll need to clear the background color yourself before pasting it on the icon. And if the text doesn't quite fit you can always make the letters a bit thinner. I haven't added anything for KOI8-U into it though, but you can always do that yourself if you want. Just remember that the font is supposed to be 5 characters high, and the extra space above and below in the font is purely to allow accents on letters. This icons font obviously isn't part of the files you need to put in the package; it's just a tool to make the icons text -
Community Translation - Ukrainian Language Add-On
Nyerguds replied to Lilly Blanche's topic in C&C 1
Well, it seems that once I got that glow right, it wasn't too hard to do the full VCR font as well! This means there are no restrictions on the "mission accomplished/mission failed" text anymore Oh, another note: there are land areas in the text_XXX file which are in "square miles" (SQ. MI.). If you want those in KM², just look in the French or German strings file
-
Community Translation - Ukrainian Language Add-On
Nyerguds replied to Lilly Blanche's topic in C&C 1
Sorry, it's a programmer term. A "string" is a piece of text. The C&C strings file format (the .eng/ger/fre files in the original game) is the original format used to store the text that I gave in the text_XXX.ini file. I finished all the fonts, and managed to reproduce the glow used on the VCR font, which means it should not be too hard to make new symbols on that font either. -
Well, this is just supposed to be a dump of things I should've released long ago. I could look into the mouse scrolling thing for the New Missions menu, but beyond that, not sure. Other things I'm probably going to do in this patch: Migrate all dinosaur resources to the core mix files, to prevent problems like this. Maybe migrate the actual Covert Ops / dino missions to general.mix? Not sure it's a good idea to make those overridable; the language system can force specific filenames and briefings on those mission numbers. Then again, even if I leave them, for mods people can always just use the mod control equivalent of the ss*.mix system to remove the files, so they just disappear from the menu. Font fixes. I just noticed there are still some errors in those. Suggestions for more peripheral fixes (file stuff) are welcome, but I doubt I'll dig right into the actual coding again.
-
Westwood Font Editor [Development thread]
Nyerguds replied to Nyerguds's topic in Modding Discussion
Fixed a couple of bugs in this, and released v1.5.6. If you copy a symbol using ctrl+c or the menu, you can now also paste the character as text (as shown in the sidebar, according to the currently chosen text encoding) in text applications. Seems like a little thing, but when dealing with these Cyrillic letters I really want to open these in something where I can take a closer look at them, lol. -
Community Translation - Ukrainian Language Add-On
Nyerguds replied to Lilly Blanche's topic in C&C 1
I finished the 8fat font. Lilly Blanche, if you can upload the text_xxx.ini file I can convert it to C&C Strings file format for you; the system to read it as ini is unfortunately not in any publicly released version of the 1.06 patch yet -
So, I've been thinking of releasing a new patch... apparently I've been sitting on a bunch of changes that never actually made it into a release because they weren't quite enough for a new version, and back then I was kind of holding out for going straight to 1.06d. That never happened, so, yea. I dug through my latest IDA database and identified all the changes I made in the exe file since the last released version. I'll probably have to communicate with the cncnet team on this to keep their version synced and to avoid conflicts, but anyway, here's an overview of the stuff it would contain: Commando bomb voice fix: removes the duplicate response of the commando when giving a bomb command. He'll actually respond with "I got a present for you" now, and the map-wide sound of him yelling that is suppressed for the player giving the command. Fixed tank death sequence for engineers, so they no longer get ragdolled around after death. Added sound to MP messages. A beep is played when receiving a message in multiplay. (I can't believe this never made it into a release) Mouse wheel sidebar scrolling. This is probably already in cncnet, but never made it to a 1.06 release. Mod and language system expansion, allowing the replacement of C&C strings files by ini files. Advanced Comm Center nearby stealth detection (like guard towers). The normal Comm Center building has always had that, so I'm fairly sure it's a bug that the Advanced Comm Center is less advanced in that aspect. Some improved checks on tooltips. WW had the tendency to ignore multiplayer when checking tooltips they only deemed necessary in early game (like "unrevealed terrain") meaning those things also show in multiplay depending on the internally set mission number at that moment. I cleaned that up. Disabling of the funpark command line parameter. Since the missions are migrated to the New Missions, the only thing this messy mode can still do is cause bugs. Fix for "join" side of LAN games, to properly show the 4 game modes. (Bases On, Bases Off, Capture The Flag, Mobile HQ) Disable house Special in LAN games. It is currently possible to edit that into the conquer.ini directly and set the player house to Special to get full GDI+Nod tech in LAN games. I'm fairly sure such things are now tightly checked on cncnet, but in the original MP modes in the game it's still possible. Extra checks showing the side as "???" when the aforementioned House Special cheat is detected in LAN. AI taunt fix - some taunts in the German version were larger than the available text buffer (and, in fact, the screen). I'm not sure if this was ever fixed. I'll need to do a few side fixes (like the messing up of the multiplayer stats ini), but that's it. Expanded sidebar is probably high on the list of requests, but that code needs some serious fixing before I want to add it; the animation you get when the available power level changes looks really wrong at the moment.
-
Community Translation - Ukrainian Language Add-On
Nyerguds replied to Lilly Blanche's topic in C&C 1
Hehe, nice work! I'll see if I can take care of the fonts this weekend. As for the fonts used on the icons and buttons, yes, they'd need adapted Cyrillic versions too, though I think the stuff on the sell/repair/map buttons is identical to the grad12 font. I've been considering making the icons text into a font file as well; it would make it easier to make text out of them, using the preview window of the font editor. And it'll also make it easier to add special characters to them, of course. I can take care of the buttons and other various graphics text if you give me the strings to put on them. Overall, the other files you have will probably need some post-processing, if only to convert them to the KOI8-U encoding (unless you know how to do that; I use a tool called Editpad Pro that can do text encoding conversions). One other thing that'll probably be needed is converting the text ini to C&C strings file. -
Tiberian Dawn CnC64 File Converter released!
Nyerguds replied to Nyerguds's topic in Modding Discussion
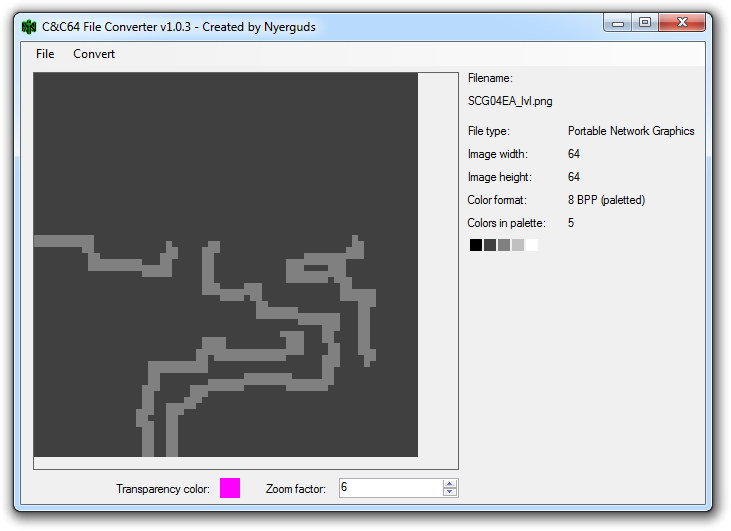
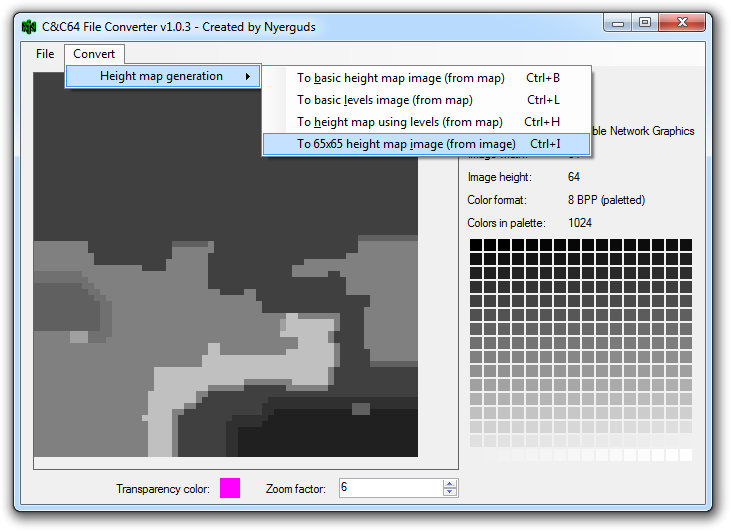
I finished the height map generation tools, and released v1.0.3. The final process is detailed here: Tutorial: Creating a mission height map for C&C64 -
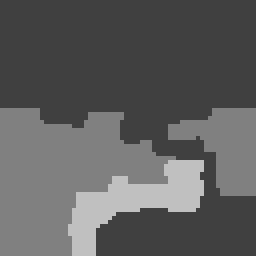
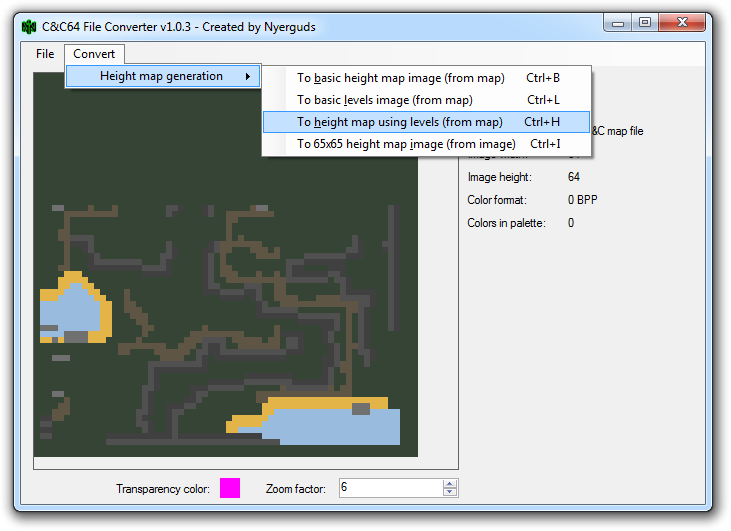
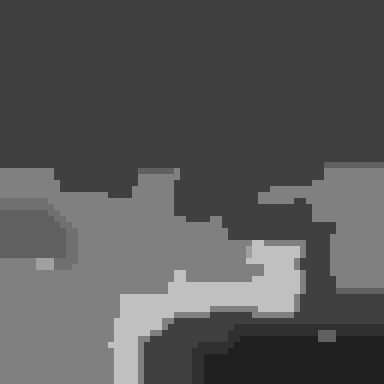
With Kamuix writing a guide on inserting maps into the N64 version, I got busy looking into how it would be possible to more-or-less automatically generate height maps of C&C maps, so inserted maps actually look good in N64. It took me a couple of tries, but finally I managed to create a set of tools to convert maps to height maps. All of these are contained inside the CnC64 File Converter. (v1.0.3 or higher) The basics: C&C terrain is not three-dimensional, but gives an illusion of 3D with the images on the cliffs. However, this illusion falls flat (literally) in a real 3D environment. To remedy this problem, they added greyscale images to the missions in N64 that indicate the elevation of the terrain (brighter = higher). So if you want to import maps into an N64 ROM and have them actually look good, they are going to need a height map too. Elevation is not done per cell, but on the four corners of each cell. Because of this, the height map images have a size of 65x65, whereas C&C maps are only 64x64 cells. However, the converter takes care of that automatically, so we'll just focus on making a 64x64 height map. The basic steps to make an image using the CnC64 File Converter: Open a map file, and convert it to a basic terrain levels image. This image will contain only the cliffs of the map. Save the terrain levels image and edit it in an image editor, and fill areas surrounded by cliffs with the colour for that level. If multiple levels are needed, use the brighter colors in the image's palette. There are 4 elevation levels that can be used. Open the map in the File Converter again, and generate the height map, using the terrain levels image you created. Convert the final image to 65x65 height map, and save it as paletteless N64 IMG format. The detailed steps: 1. Convert a map to a basic levels image: Open the map you want to make a height map for. The process works best if there's a .ini file with it that tells the program which theater the map is, and how big the actual used area on the map is. The ini file itself will not be accepted by the program, so open either the .bin file, or the already-converted .map for the N64. Open the "Convert" menu, go to "Height map generation", and select "To basic levels image (from map)". This option will only work if you have a map loaded. You will end up with an image which has a dark gray background, and only the cliffs on it, in a slightly brighter gray. Note that this is a paletted image with five colours; even if the image is later saved as high-colour, it will be matched back to these five colours to be interpreted as height levels. As you see, the image has some modifications compared to the original; the conversion takes the last terrain types encountered at the edges of the actually used portion of the map, and stretches them to the full frame. This is done so cliffs placed outside a map's border to control reinforcements would not influence the height map. Note that the image is not saved yet at this point, so press Ctrl+S and save it to disk. 2. Create the height levels image: Now the real work. Open the saved image file in your favourite image editor, and connect the cliffs to form closed areas. To do this correctly, open the map itself in a map editor so you can see the directions of the cliffs, and see what kind of elevation each area should have. Here's my process in a few steps: It doesn't matter if the image is saved in high colours, but as noted before, the converter will match it back to the five colours in the original image's palette, so there's no use in making detailed slopes in this. Its only function is to separate the terrain into levels. For the record, the grey tints used for the five levels are: #000000 (R=0, G=0, B=0) : Pure black. Shouldn't be used, since water creates a slight depression into terrain, and you can't do that on the lowest level. #404040 (R=64, G=64, B=64) : Basic terrain. This will be the starting level on the image, and should be seen as lowest level you can use. #808080 (R=128, G=128, B=128) : Cliffs elevation #1 #C0C0C0 (R=192, G=192, B=192) : Cliffs elevation #2 #FFFFFF (R=255, G=255, B=255) : Cliffs elevation #3. Note that this is the highest possible level, and no more terrain details can be put on top of this. Rivers should work, though, since they decrease the terrain. Anyway, with that done, we end up with our terrain levels image: 3. Creating the actual (64x64) height map Now we got our levels image this is fairly simple. Once again, load the map into the converter program. Open the "Convert" menu, go to "Height map generation", and now select "To height map using levels (from map)". It will ask you to select the height levels image. Select the final product of our work from the previous step. Now the real magic happens. It will generate an image that adapts the terrain to the new heights, and if your cliffs match your levels image correctly, it will make sharp elevations for the cliffs and smooth slopes for the openings where the level decreases on non-cliff terrain. Furthermore, the height of rivers and other water will be applied on each specific level. Once this step is done, feel free to save the image if you want to add some more specific tweaks to it, or fix any errors the generator might have made. If you think the map is good enough, though, you can continue straight to the next step. 4. Converting the height map to the final format So we got a 64x64 height map image now, loaded into the converter. The N64 game not only needs the image to be 65x65, but also needs it saved in the specific paletteless IMG format. First things first: go to "Convert", "Height map generation", and select the final option: "To 65x65 height map image (from image)". As you see, this is the only option in there that doesn't use a C&C map as input but an image. Select it, and the 64x64 data will be centered in a 65x65 frame, creating smoother edges everywhere. Starting from v1.04, the image in the editor will automatically identify itself as paletteless N64 image, so all you need to do is press Ctrl+S to save it in the correct format. ...and that's it! You have your height map, ready to insert into the ROM. The name format the game looks for is exactly the same as for the .ini and the .bin, just with .img as file extension.


-
He's not even using the latest version... And he has the scroll rate problem. Pfff.
-
This topic has been moved to Mapping Tutorials. https://forums.cncnet.org/index.php?topic=7566.0
-
Tiberian Dawn CnC64 File Converter released!
Nyerguds replied to Nyerguds's topic in Modding Discussion
Found a nice new way of doing things. If the user provides an image based on the cliff formations which divides the map into plateaus, the system can automatically trim the edges of these plateaus to give a better slope on the cliffs. This basically means you need to save the map's image and convert it to these plateaus. At this moment, this approach also means that rocks on the actual map are ignored in favour of the plateaus, though the plateaus are trimmed down at all sides, so small height differences get lost in this method. Because of this, this is really only meant as a tool to help make a height map, and not something to actually automatically generate the heights. The process in action: terrain map / plateaus / combination / applied heights (note the river height change) / conversion to height map The plateau image will always be simplified to just five levels; 0, 64, 128, 192 and 255. So when making it, use these values for the gray colours. Plateaus give the basic height, meaning water and beach will be slightly lower than the plateau height. Because of this, the basic level is 64, and not 0. Currently I just got this hardcoded to read the same filename as the map file you opened, but with "_lvl.png" added behind the basic filename. I'll probably make this more use friendly later and actually put a UI for this process in -
Tiberian Dawn CnC64 File Converter released!
Nyerguds replied to Nyerguds's topic in Modding Discussion
It's gonna end up a lot simpler than I thought, lol... I found out the reason my resize method gave odd results was because I apparently used a resize method in Gimp (cubic) that was just not simple enough. I now tried another one, "Linear", and that gives exactly the result I intended. Basic method is just, assign all heights the correct colour, resize to double size (128x128), add a 1-pixel border around it, resize back to half of that new size (65x65) using Linear resize. I might even just add an option to do just the resize itself and, accept already-greyscale images from the user, so they can assign plateaus and such. So all I gotta do now is see how the resize in .Net reacts, and if I can give it different methods. Fairly sure I can, though; if I remember correctly the pixel resize used in the zooming image box already needed a tweak in exactly that code. -
Community Translation - Ukrainian Language Add-On
Nyerguds replied to Lilly Blanche's topic in C&C 1
Well, some of files need some post-processing, but I can take care of that. The line break character in the main strings file is replaced by the `, so that needs to be preserved. But that's all explained in the guide too. -
Tiberian Dawn CnC64 File Converter released!
Nyerguds replied to Nyerguds's topic in Modding Discussion
By the way, many thanks to Chad1233 for his help in beta testing this tool. I never even knew CCMap also messed up the 'clear terrain' tiles when saving a map. Seriously, how hard is it to get that right? It's two freaking bytes, and every official map has them! O_o -
I got a present for ya! http://nyerguds.arsaneus-design.com/project_stuff/2017/CnC64FileConverter/release/ This tool can open about any graphically-representable format in the N64 game, and can convert between most of them. This includes images, maps, palettes and tilesets. Its usage is really simple. Drag-and drop a file in there, or use File-> Open (Ctrl+O) to open a file, and use Save (Ctrl+S) to save it. the Save dialog will give a types dropdown in which you can select the type to convert to. Note that there is also a Quick Convert (Ctrl+E) option in the menu. This is actually identical to Save, except that it automatically selects the most logical convert type when opening the "Save As" dialog. This means PC images will quick-convert to N64 img format and vice versa, N64 and PC map formats will convert to each other, and palettes will convert between the N64 8-bit and PC 6-bit format. Tilesets can only be exported at the moment, not saved, because they have a rather annoying format of tiles using sections of a larger colour palette. I might make a converter from and to actual single cells for that later, when I add a 'Convert' menu to the program. One of the immediate practical uses of this this tool is that it can write the image format used as height maps by the game's missions. These images are paletteless 65x65 images on which each value in the image data represents a height, which is why I display them using a grey palette. This is the "C&C64 paletteless image" type in the save dialog's dropdown. The image needs to be either high-colour or 256-colour to be converted correctly for a height map; if it's 16-colour you'll get a 16-colour paletteless img file, a format which is also used by the N64 game, but not for that I mentioned a 'Convert' menu before... one of the things that'll be in there is an option to automatically convert a map to a rudimentary height map. Here's the algorithm I'm developing for that, shown on rocks: This isn't programmed yet, but the theoretical algorithm seems to work right. The final conversion will do similar things with beach and water, and then combine them in a logical way.
-
Community Translation - Ukrainian Language Add-On
Nyerguds replied to Lilly Blanche's topic in C&C 1
Um... the "mission accomplished" font only contains the numbers 0-9 and the uppercase basic A-Z alphabet. So a lot of those would indeed need to be added. I can fake some of these, but there's definitely no Д, Л or П in there You really don't need to wait for the fonts, though. You can go ahead and translate the text files. As the guide mentions, there's also some additional text needed, for things that are in the game as graphics, like the sell / repair / map buttons, and the "primary" text on buildings. One of the hardest parts will probably be the unit icons. I have a lot of experience with editing icons, but for long names, in foreign languages, I have no idea how these names can be abbreviated to fit on the icons. -
Red Alert 1 Mission Converter (3.03p-Iran custom missions dialog)
Nyerguds replied to FunkyFr3sh's topic in Red Alert
There were no custom exes involved, as far as I could see. It just extracted and deleted those files. That is, unless it tried to make hacks to the exe; I did all this in a folder without RA. Though I assume it would've given some sort of error if that had been the case. It would also have made it very version-dependent I think. -
Community Translation - Ukrainian Language Add-On
Nyerguds replied to Lilly Blanche's topic in C&C 1
Possibly. I don't think it was ever finished :-\ I never lose anything though. It's all still on my disk. so if you want to finish it, we can work on that -
The Dune 2K tileset converted into a theatre for Red Alert 1 [V1.1]
Nyerguds replied to Messiah's topic in Modding Discussion
So, what, you just replaced water by sand or something, and set it to Beach type to make it unbuildable? It's funny that that actually works in RA, with the terrain type being coded in the tileset files instead of the tileset definition in the exe :laugh: ...does ore grow on beach? -
Community Translation - Ukrainian Language Add-On
Nyerguds replied to Lilly Blanche's topic in C&C 1
Well, KOI8-U is in the dropdown, so that shouldn't be much of a problem. Thanks for the research! The dropdown lists all text encodings which are one-byte-per-character (8-bit, as the wiki said), and in which the normal 0-127 ASCII character range is preserved. Well, all those known by the .Net programming framework I used for the editor, that is. I basically just request the full listing and then filter a bit I'll see if I can find the time to actually make the fonts in KOI8-U then. ...and I really ought to update that guide, too One small note: the font used for the "Mission accomplished" / "Mission failed" text is a special case; it's all caps, and it's got a bit of a colour fade in it that makes it hard to edit. So I won't be making a complete KOI8-U version of that. But if you absolutely do need special characters in these two phrases, I'd be willing to just make the few symbols that are needed. -
Red Alert 1 Mission Converter (3.03p-Iran custom missions dialog)
Nyerguds replied to FunkyFr3sh's topic in Red Alert
lol, it has a graphical installer program. I fired up DOSBox and got them out. There are two separate campaigns that apparently can't be installed together. It deletes the files of the first when installing the second. The program contains a lot more than that, though. There's a load of background story and stuff like that which isn't anywhere in it in text format, but can only be viewed through the program. So I went ahead and made a bunch of screenshots of it. I packed it all together here: http://nyerguds.arsaneus-design.com/cncstuff/missions/ra1-fd-genesis.zip