Nyerguds
-
Posts
6190 -
Joined
-
Last visited
Everything posted by Nyerguds
-
Oh, really? You just select some text and click the "quote" box that pops up. and you can do that as many times as you want.
-
Tiberian Dawn Terrain tricks: northern island corners
Nyerguds replied to Nyerguds's topic in Mapping Tutorials
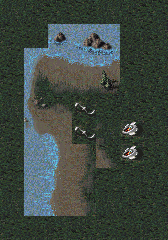
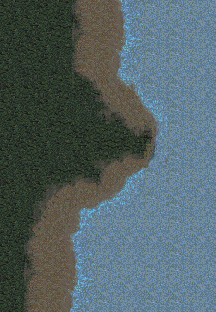
Not quite as perfect, but still pretty neat: substituting beach by a piece of road.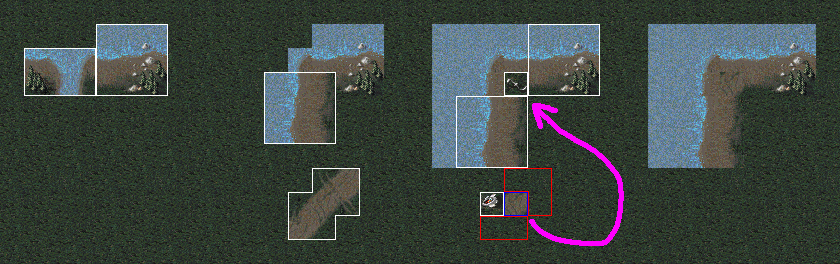
-
FINAL SUN - Create missions & compstomps! GIF Tutorials [TS]
Nyerguds replied to Holland's topic in Mapping Tutorials
Those sure are some pretty GIFs -
Tiberian Dawn Terrain tricks: northern island corners
Nyerguds replied to Nyerguds's topic in Mapping Tutorials
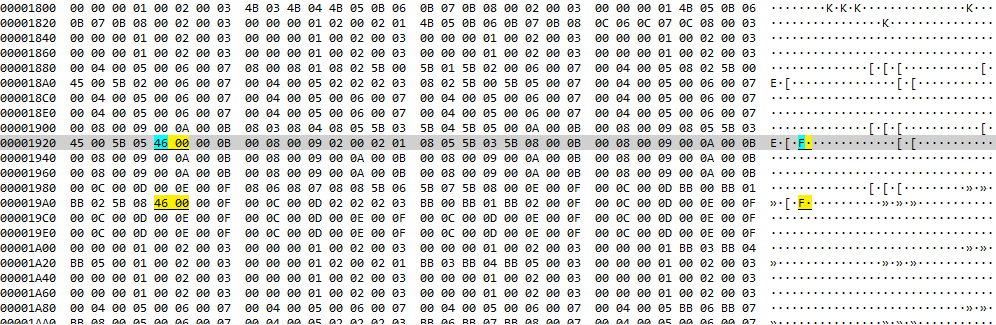
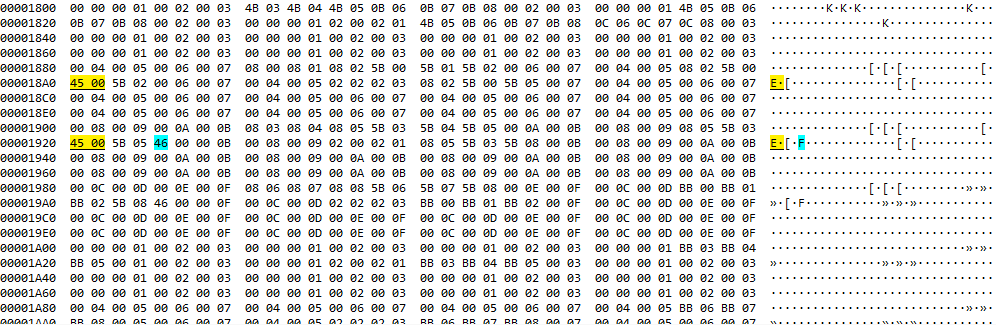
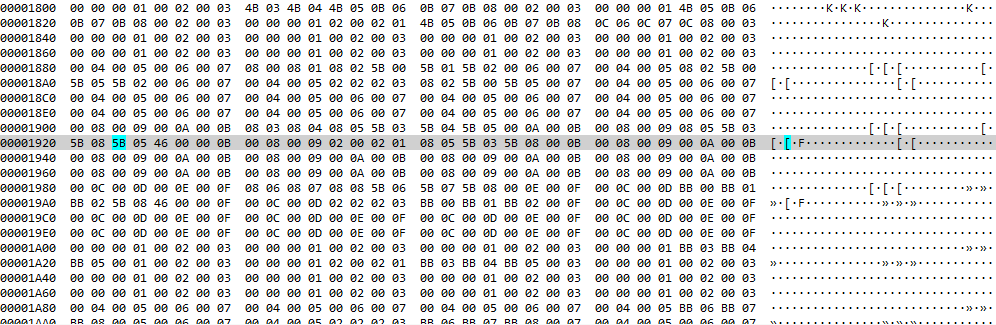
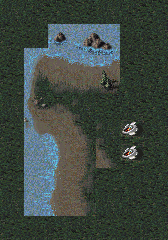
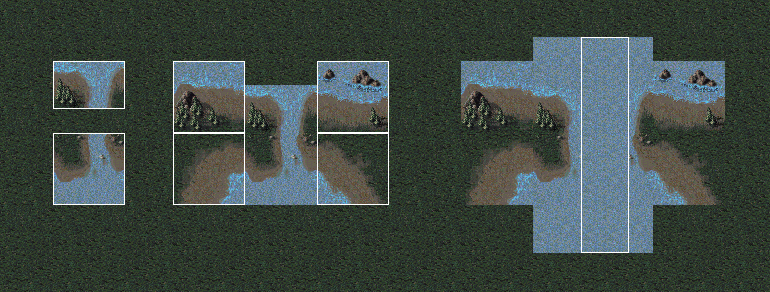
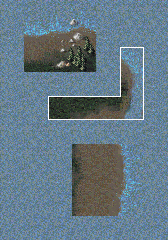
Thanks Here's a slightly decreased stump design, which does require a little hex editing. The piece indicated in red on the third frame is moved to the area indicated in blue. Small intro to hex editing maps... a C&C map consists of 64 rows of 64 cells, with 2 bytes per cell, making it always exactly 8192 bytes long. For each of these cells, the first byte is the tileset ID (as can be looked up in my tilesets ini file), and the second indicates which tile number of that tileset to use. Tileset ID FF is reserved for clear terrain (official maps have all clear terrain saved as "FF 00" cells), but, annoyingly, XCC insists on saving clear terrain as the actual repeating 4x4 tiles pattern of all 16 cells of tileset ID 00, meaning values 00 00, 00 01, 00 02, etc, up to 00 0F. To hex edit a map, I basically use a 1x1 'marker' block that is easy to recognize. My default marker in the old days was 05 00 (rock in water) but given the aforementioned fact that xcc doesn't use the default terrain marker, there will be a lot of "00 05 00 06" in there already, making the value 05 00 hard to use. Instead, nowadays, I've been using the P04 "UFO" tile. It's generally rarely used in a map (and if it is, you can leave that for after your editing), and it has an ID higher than 0F so we don't have to deal with XCC's blank terrain mess. Its ID in the map file should be "46 00" (tile ID 70, tile 00). P03 (45 00) is another good one, but the more different markers you use, the more map decoration you have to delay until after all this editing. Anyway. To copy the piece above, first mark each area using a marker. The terrain to replace can be marked simply by replacing it by the marker. The piece to copy should get a marker to the left or right of it, since maps are saved in horizontal lines, so you'll know the bytes right next to your marker are the bytes to copy. Note that you don't strictly need the copy markers; if you know which tileset the tiles are from (XCC editor shows this), and you know which tiles they are, you can figure out that the tileset is SH9, which has ID 91 (in the tilesets.ini file), or 5B in hex, and that the tiles to use are the center right and lower right ones in the 3x3 grid: 0 1 2 3 4[5] 6 7[8] This means the values we'll find are "5B 05" and "5B 08". So anyway, P03 is our replace marker, and P04 indicates the cells just right of the tiles to copy. With that done, save the map, open the .bin file in your favourite hex editor, and let's look for 46 00, the ID of our copy marker. As predicted, the values before the copy markers are "5B 05" and "5B 08". Now we remember those, and we go find our replace markers, 45 00. Well, that wasn't too hard; they're right there. So now we replace those two by the two values we found. Done! Save and exit, and let's see the result if we reload the map in XCC Editor: The edit is applied! Now you can clean up the copied piece and the copy markers, and your edit is done.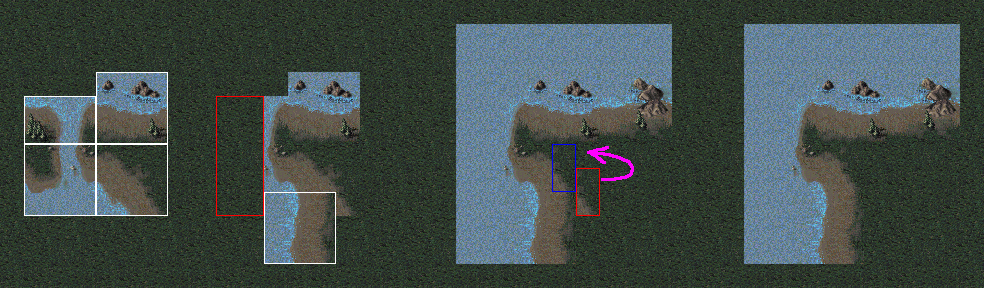
-
As some of you may have noticed, compared to Red Alert 1, C&C1 is lacking a fair bit in terms of tilesets. And to remedy that, map makers have had no choice but to resort to trickery. However, the point of trickery is of course to actually trick the player. If you have a horrible-looking terrain transition, then sure, pasting a dozen trees over it will probably mostly cover it up... but it's not a pretty solution, and it's hardly subtle. Instead, let's look at some more elegant solutions that only involve map tiles. Two of the things that requires such trickery are the north-east and north-west shore corners. Plain and simple, C&C1 doesn't have them. And yet, when Chad1233 asked me about them, I distinctly remembered making maps that contained them. Some research later, I realized I made fairly pretty-looking corners by cheating the system; I built them by cleverly combining tiles from different tilesets. One of these tricks, the one seen at the left side, is fairly easy. I generally call it "the stump", because it always sticks out a bit. These 'stumps' can be made in two directions, and are done simply by taking the river mouths of both the top- and bottom-facing variety, pasting them together, cutting them in half, and then putting the normal curving-down tileset at the bottom of the half you end up using: So yeah, fairly simple. But, for the north-east version up there, as you notice, it does not actually stick out. Yes, there's clearly still river-trickery involved, as you can see from the grass leading up to the water, but the shore itself actually has more or less the shape you'd expect from a shore corner. This process is a bit more tricky, but it can in fact be done without resorting to hex-editing tiles into the map's .bin file (see below for more on that). Here's how I did it: Of course, these two final shore pieces in the two last steps can be whatever you want. The actual bit you need is just this: And it can just as well be used with other adjacent pieces: The possibility, as dear Dr. Moebius said... are limitless! I fiddled around a bit, but so far, I haven't been able to construct a non-stump version of the north-west one, though. if I ever figure one out, I'll post it here too. If anyone else knows similar mapping tricks, please post them! I'd love to see more of these.

-
We really need to exchange information on what is in there... it's dumb to not have that stuff in the 1.06 patch -_-
-
cnc-ddraw already fixed this... there's no way to change that except through cnc-ddraw. Even if we found some in-engine way of stretching video content, these aren't videos; they're built up from WSA animations, SHP sprites and fonts.
-
Community Translation - Ukrainian Language Add-On
Nyerguds replied to Lilly Blanche's topic in C&C 1
No problem. It might be easiest if I just upload the whole Ukranian repack on the ModDB site, actually... the current system of language packs and video packs is admittedly a bit of a mess. And then you guys have another download mirror for it. To be honest, the language packs system was only created that way because I found it neat to be able to install all those languages together. I admit that that probably isn't really relevant to people who just want to have the game in their own language -
Community Translation - Ukrainian Language Add-On
Nyerguds replied to Lilly Blanche's topic in C&C 1
Ah, no, sorry. That was a bit of a misunderstanding. I was not questioning whether I was credited, but you can understand that I got a bit worried after you disappeared and I then found the pack released as full game repack, without any further mention to me of that translation pack I asked to mirror on the patch website. It just felt a bit too much like that Russian fiasco for a moment. I read everything you posted, though, and the release site there, too. I know why you disappeared, and I know I'm credited. No worries -
Community Translation - Ukrainian Language Add-On
Nyerguds replied to Lilly Blanche's topic in C&C 1
Yeah, I checked out the other thread... impressive work! Good luck on the other games. I just mentioned the translation of CCConfig because it's really the easiest part to translate. No character set conversion, no inserting in mix files. You just make a copy of the "ccconfigeng.lan" from the translation guide, rename the "eng" part to "ukr", open it in Notepad, replace the text inside, put it in the folder, and it works. The only real work is making sure the text fits on the tool. -
Community Translation - Ukrainian Language Add-On
Nyerguds replied to Lilly Blanche's topic in C&C 1
Oh, wow, I almost thought you pulled a Russian Disappearing Act on us too. Though to be fair, I haven't been here much either, or I would've noticed this reply, umm... half a year ago -_- Anyway, Glad you're all right and back in the saddle! you got a link for the pack somewhere? I'd like to mirror it on the ModDB page of the patch. As for the WSA files, I got a tool that can correctly convert them now, with no hassle at all. http://nyerguds.arsaneus-design.com/project_stuff/2017/CnC64FileConverter/release/ I just found the release... so, uh, you ended up repacking it? Could I still get the files to upload it as language pack on the site? And from the included readme it seems the CCConfig tool wasn't translated. That's pretty easy to do though; the translation guide should cover that. -
Why on earth did you post a topic about a cncnet request in "modding tutorials"?!
-
Where's the Stock Sound for the Chronosphere?
Nyerguds replied to Chrono Vortex's topic in Red Alert
yea, that sound is the SC Terran building landing one too, hehe. WW just used the first part, and the Blizzard guys seem to have sped it up a bit. -
Where's the Stock Sound for the Chronosphere?
Nyerguds replied to Chrono Vortex's topic in Red Alert
Finding stock sounds is more @tomsons26's domain.... -
Tiberian Dawn Artillery Re-Balance (Mini-Mod Added)
Nyerguds replied to KevinLancaster's topic in C&C 1
This is normal. All double-owned prerequisites are set this way, and the SSM is more or less a scrapped unit recycled for multiplay, so that doesn't surprise me at all. -
The Modding Tutorials forum is meant for posting tutorials, not for asking for modding help.
-
Command & Conquer: Dawn of Tomorrow teaser thread
Nyerguds replied to Kilkakon's topic in Modding Discussion
Which would do what, exactly? C&C has no support for healing weapons, nor for capturing units. The only way to repair is through the repair pad, and the only way to capture units is by putting an engineer into a building the unit is docked to. -
I doubt it... normal missions are full of special code inside the mission files, and the ROTD mod is a lot more than just some graphics replacements. It would require a lot of work in the missions themselves.
-
If I remember correctly, the only requirement is that it needs a unique starting letter, since the .mrf remap tables start with just one letter as theater prefix.
-
Command & Conquer: Dawn of Tomorrow teaser thread
Nyerguds replied to Kilkakon's topic in Modding Discussion
A10s with real ranged weapons behave oddly, though... they just shoot it in front of themselves, so chances are that like the RA1 Yaks they never really hit what you target them at. -
Um. Adding tilesets in your mod would be really easy. Most of the work would be setting these terrain ownerships for the terrain pieces.
-
Timing and speed stuff in general is really hard to research in the game... because debugging, by its very purpose, pauses things.
-
Maybe one day I'll feel like scanning the entire C&C1 strat guide, lol... but today is not that day.
-
Oh, interesting. Talking about liberated games, have you seen these? http://www.oldgamesitalia.net/forum/index.php?showtopic=16027&st=0
-
Westwood Font Editor [Development thread]
Nyerguds replied to Nyerguds's topic in Modding Discussion
The mess with transparency just got kicked up a notch... Apparently when you press Print Screen on a (Windows 10) desktop made of 2 screens with different heights, the resulting image is actually put in the clipboard by Windows itself as that bastard DIB format with transparency in it; the area under my smallest screen is transparent, not black. This was saved through the font editor's clipboard code. When pasted in Gimp, the area underneath the left monitor image is, again, black, as it should technically be according to the DIB specs.